When we were planning how the nursery might end up looking, one of the things I wanted to really have (if we had the space) was a wee clothing rack for all her little dresses - especially if there was no wardrobe in the room. ANd, wouldn't you know it, we ended up in a house with no wardrobe in the nursery. So suddenly the clothes rack became a priority for me. I couldn't find any stores which sold a rack that was appropirate for the size I was needing. Like, I know it won't be ages till she is walking, but when she is old enough, I want her to be able to see and play with her dresses. And maybe even use the rack to play dress ups.
Cue Pinterest research (like everything else I do right?). I found there were heaps of beautiful wooden ones, some really lovely ones made of steel piping, and all sorts made of PVC piping. The issue was, that any tutorial I looked at confused the shit out of me. And when I went to the store to buy a list of pipe bits I got even more confused. Then when I went to build it, I found that none of the methods I found, actually made it stable. And I don't want it all to fall down on Sophie. In the end, I bought a bunch of stuff, didn't use it all, and ended up just building it the way that made sense to me...
Note:
I have a feeling, that at Lowes or Home Depot, you can have your PVC piping cut to length for you. If this is true, that would make things a little easier. Here in Australia, I went to Bunno's. The thinner pipe (15 mm width) comes in 1 m lengths. So, I did the cutting at home with a saw. Yep, I'm awesome. Rob was a little worried so came and supervised me.
Also note, I am back in the land of metric measurements (woohoo) but will list the imperial numbers at the bottom of the page to keep everyone happy : )
Anyway, here is what I bought (and actually used).
4 x 1 m lengths of PVC piping (15 mm width)
6 x elbow joints (15 mm width)
4 x T section joints (15 mm width)
And here is what ended up working (there were a few fails on the road to this win).
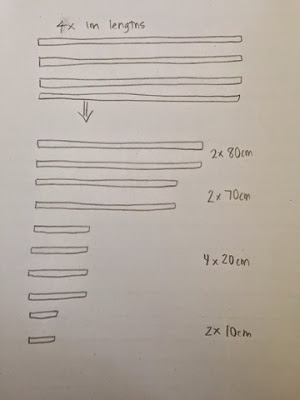
Decide the height you want. I didn't want mine to tower over wee one, and the legs will give it a little extra height. I decided on the following measurement scheme:
 |
| Some notes with lengths of the sections. |
So, I cut 2 x 70 cm lengths. I then cut the remaining 30 cm lengths down to 20 cm.
This means, out of the 1 m length, I ended up with 1 x 70 cm, 1 x 20 cm, and 1 x 10 cm sections.
I did the same to get 2 x 80 cm sections and 2 x 20 cm sections.
 |
| This is the sets of measurements I used to get the most out of the 4 sections of PVC. |
I found it helped to lay all the pipe out like a 2D image, and start putting it together that way.
Stability comes from the following aspects of this rack:
- The elbow joints as legs seemed to increase the stability of the base, giving them more of a grip to the floor.
- By using an extra piece of pipe to connect the two T sections, it strengthens the base instead of leaving it with just a connecting joint (this was a lesson I learned).
- The length of the feet of the rack seem to be just long enough to provide balance, to stop it tipping over, without making it cumbersome or a trip hazard.
- The base bar provides the most stability across the rack, and is essential.
- And of course a tight fit between all the joints and pipe sections. Make sure you don't accidentally grab stuff in the wrong size. It wasn't until I got to the counter to pay that I noticed some of the joints were in larger sizes. Which is a reminder to everyone to put things back in the right spots in stores haha.
Hmmm... I like it, but it's a little plain. Help?
So, I appreciate that at this point it is just a bunch of pipes. I plan to keep it just as white piping for now, but may change it later. For now I like that the pipe colour doesn't take away from the patterns in the dresses and rompers. Or my lovely dividers by Lucy Darling Shop. But, if you wanted to make it a little prettier, here are some ideas I have been tossing around..
- Spray paint it the same color as your nursery theme, or your wee ones favorite color.
- Apply a bunch of small round stickers along the rack, spray paint with your favorite color and then peel off the stickers - instant super cute polka dot clothes rack.
- Go nuts with washi tape. This seems to totally lend itself to a neat pattern of washi tape.
What do you think? Have you tried a similar project? Are the instructions clear, let me know if anything needs clarifying. This took me a few different attempts to get it stable and just so.


Wow this is intense! Measurements and saws and oh my! How amazing that soph has something her mama made her to display all those gorgeous dresses!!
ReplyDeleteSuch a great idea!
ReplyDelete